Showing posts with label diy art. Show all posts

just tape it


you know I'm a die-hard painter, 
but be it washi, paper, masking or electrical, 
tape is showing up in some clever applications these days...

as wall decor....


linear black and white stripes


metallic geometric


simplistic and wrapped onto floors


part of an art wall composition


to frame art - LOVE


or reign in an inspiration wall - hello, office!


yummy color, yes?


as an outline for color-blocked walls


to highlight existing molding..


my favourite is this tongue-in-cheek faux panelling ....
may just offer la solution parfait to the panelling/no panelling debate 
going on between the hubs and I for our boudoir :)


What do you think? Something here you would use in your space?


DIY: textile art


Remember when I showed you that pic of that mudcloth I found for a steal on ebay? Well, it arrived in the mail last week. Yesterday I built the frame and this morning it was stapled and placed in it's new home above the mantle. I'm in love!


It needs more layering, of course, and it has to be hung properly - currently it is sitting on a lucite box used to try out the height! But don't you just love it?!! I have been searching for three years for the right piece to hang in this spot, and there is a great sense of satisfaction at having finally found it. The walls are finally white, we found a sofa last week that D and I both like for this room, and so progress is being made, SLOWLY! Why is it my that projects round here move at a snails pace? Like the barefoot cobbler's children, I suppose :)

I'm off to source fabrics today for a client, it's a perfect day for driving with the wind in your hair.... hope the sun is shining where you are, as well - x am

walls of flowers


Couldn't stop thinking about these pretty flowers after I pinned them...


wishing some of those, or these, would magically bloom across a wall around here....


Want to make some? here's a fabric diy and a paper diy that look simple enough for a sunday afternoon...


Having some of the family up for Miss N's bday - that's as good an excuse as any to cover your walls in flowers, isn't it?!!  Have a great weekend!   x am


Photo links:  Satin Flowers polymer wall sculptures  grey orange peony pearl+paper flowers  saucer flowers white roses  


it's glitteriffic...

This year I'm all about sparkle...
and the way to my heart is through glitter!
(I've even glittered up the blog header, it's a madness)

Since I've bought about ten kinds of glitter at the craft stores recently,
 and went looking for some clever ways to use it.


So here's a collection of amazing glitteriffic holiday DIY's....


first off, just in case you want to go organic, glitter made from salt.
Not sure how this would do when mixed with liquids, but maybe spray adhesive?


How about skipping the tired old bows and wrapping your presents up 


Serve champange in these sparkly flutes (wouldn't they be cute done up with 2012 for New Years?)
pack some pretty flatware for a winter picnic,
or elevate cupcakes to new heights with this charming, simple DIY cake stand.


Add bits of shimmering art, hang some chichi lanterns (you can also buy them, here),
add a scalloped border (these are from Etsy, but so cute - why make them?) 
or some sparkly love to your mantle...


Glitter in pinks, 
glitter in blues,
glitter on fingers, bags and shoes....


Small hits of glitter might just make me happy every day of the year.
how about magnets or tacks at your desk, or a


Who's going to the store to buy glitter?!!!


If you are, a little tip I picked up along the way...
to prevent glitter from getting EVERYWHERE (unless you want it that way, in which case, go crazy :)
mix the glitter with the glue/paint/etc PRiOR to adhering it to whatever surface your shushing up -
 a LOT less messy and it stays put after.


Happy last day of November, darlings - x


Artist: Kim Davies


If you've ever left a comment here, 
you know that "they are my favourite part of blogging"...
that's what it's all about right? 

Sometimes it's hard to hear what others have to say,
but I'd rather hear the bad with the good than hear nothing at all.

Most days :)

So when someone new drops by I try to go by their blog
 to see what wee bit of wonderful is happening over there.. 

Last week Kim Davies left a note about the post, Setting Your walls Free.
She mentioned being an artist, so naturally I went straight over to her blog, Inspired Lines,
(nothing better than procrastinating over art, is there?)
which led to her gallery....
and you are going to be glad I did!


How about this....


and this....


 and this....


and if the eye candy isn't enough to draw you in,
the day I passed through she had posted an online tutorial about line drawing - 
how generous is that?


I've actually never seen an artist offering up the technical bits of their brilliance before. Ever.
Immersed in all this brilliance, I couldn't help myself..
I bought these two drawings (originals!)
and a print of Lip Service...


She also has a giveaway going on....


I'm sure you've all left by now, but if not, hope you have a splendoriffic thursday - x


the easiest diy art....


I promised you a post about the DIY art we made for Natasha's room,
and here it is :)


This is so incredibly simple, and you can customize it to any color scheme.

Supplies:
two canvasses (dollar store)
 neon paint (dollar store)
leftover paint from around the house
low-tack tape
ruler, black sharpie


The fast one:

First I taped off the triangle piece....
paint and remove tape....

after an hour these shapes were dry enough to repeat the process with the next layer.


Done :)

Told you it was simple, lol!

There are two really important steps to ensure crisp paint lines:
be SURE your tape is adhered well before painting to prevent bleeding, 
and remove the tape right after painting, to avoid pulling off half-dried paint later.


Second painting took a bit longer, because there is more detail and more layering...

First tape off the stripes that you want across the front,
then tape off the back layer.


Paint the back stripes, skipping some.
Remove tape and let dry.
Re-tape additional back stripes, and remove tape.


Now, if you are painting a color on the front stripes,
 wait til all the stripes dry,
then tape the front ones off  (tape on the outside of the stripe) and paint.

(sorry about the color of the pics, it was late afternoon when I started and dark when I finished!)


This is where I cheated a little!
I wasn't particularly careful with my taping and the edges were pretty rough, 
but I knew that I was going to do this last step, and they wouldn't show.
I was painting the top layer black, so I just filled in the centre of the stripes and let it all dry together.
Once it dried, I got out a sharpie and a ruler, 
and edged all my black portions and in between the colors.
(not that I'm OCD, but imperfect edges bug me...
but I'm really not type a.... well, maybe just a little!)


I added a few extra stripes in here as well...

Then we hung them, and added a quick little "take a smile" bit in between...
this is a joke between Tash and I, we're always trying to get each other to smile.


 If you'd like one just print this off..


That's it!


Kinda makes you want to try one, right?
If you do, please send me pics and I'll post them ...


We have back-to-back thanksgiving dinners this saturday and sunday -
and they're both at our house!!
21 on saturday, 17 on sunday...
needless to say I won't be blogging :)

See you monday!

Hope you all get to spend the weekend with the people you love - x


Miss N's room: the reveal


If you read monday's post,
you know we've just finished Miss N's room.


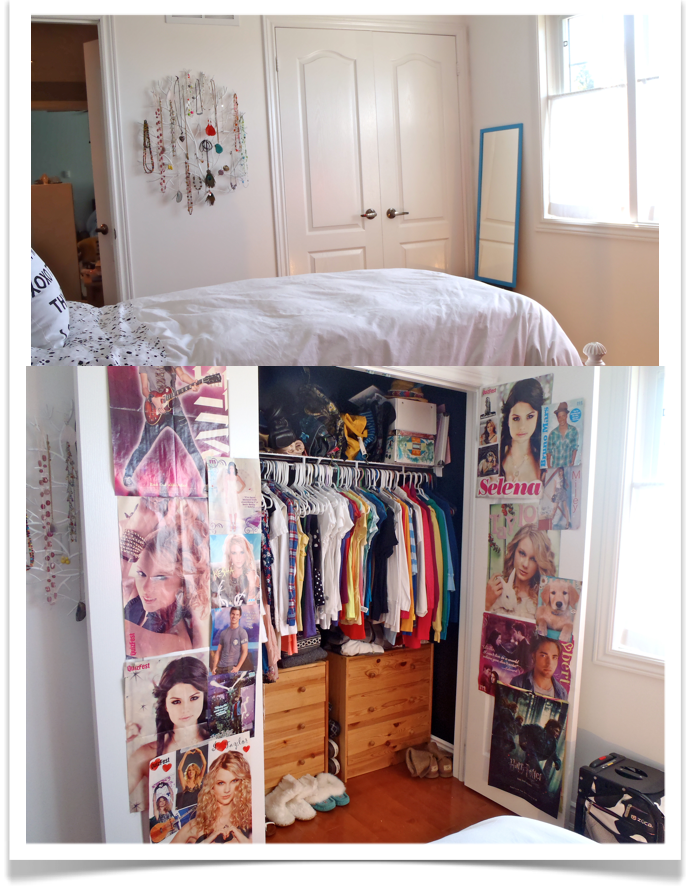
This what we started with....


you can read more about that here.

It all began with a brilliant azure box Natasha found while we were out shopping one day.
She decided on a blue and white scheme.
Since she has a very dark grey leather chair, and LARGE tv in there, I suggested hits of black as well.

Done.

We (that means I, lol) painted the black walls white -
used Behr paint plus primer in Falling Snow, for the first coat.
It covered incredibly well, but the color was far too warm for a west facing room,
and the range of whites is really limited with this brand (are you listening, Behr?!!).
So, we layered 2 coats of Martha's pure white 
(no tint, straight out of the can - how's that for easy?!!) on top.
That's it, three coats, not too painful after all...


If you are looking for brilliant white walls, this is your paint -
the result was a very bright, slightly clinical space.
We color matched the box into a behr ultra base, as well.
(it's close to Brilliant Sea 520B-6)

This would do for the old cork board we planned to rescue from storage,
the existing mirror she used over her dresser, and a new long wall mirror.


We painted out a wire branch sculpture for an art/jewellry display....


Now, the palette was dynamic, 
but it needed warmth, and no ordinary canary or watermelon would do -
 so enter the fluorescents!

Yup, fluorescents.

Tash's idea :)

She's only this age once, why not let her have a little fun?

We upgraded a vintage dress form, and painted out some frames and canvasses
(I'll post more about the DIY art process tomorrow - SUPER easy)


Would you like to see how it all came together?


the view from the door...


Miss N headquarters - which is NEVER this tidy :)
We added a little zebra to the newly painted bulletin board -
looks like it's painted on, but it's actually a really heavy wrapping paper, shh, don't tell...


Ikea frames - 3 for $5.
With this price point and arrangement,
she can add to this wall whenever she likes.


Rocks and crystals.
It's a fascination, and she finds them EVERYWHERE :)
We corralled the largest and prettiest into lucite trays for display.


The bed.
Dressed with a new duvet and pillows (perfect for a constant "texter").
Framed out with our DIY art and a funny little printout that has sentimental value.


Are you wondering where all the teen "stuff" is?

Well, the dresser holds heaps of bits and bobs...
but what about the umpteen posters?

One is waiting to be hung behind the door...


and the rest live here....


Let's just keep those closed, shall we?!

That's it, the big reveal...

hope you like it, 
Miss N is over the moon, and that will do for me - x


Room Design Pictures Proudly Powered by Blogger