Showing posts with label fluorescent. Show all posts

Miss N's room: the reveal


If you read monday's post,
you know we've just finished Miss N's room.


This what we started with....


you can read more about that here.

It all began with a brilliant azure box Natasha found while we were out shopping one day.
She decided on a blue and white scheme.
Since she has a very dark grey leather chair, and LARGE tv in there, I suggested hits of black as well.

Done.

We (that means I, lol) painted the black walls white -
used Behr paint plus primer in Falling Snow, for the first coat.
It covered incredibly well, but the color was far too warm for a west facing room,
and the range of whites is really limited with this brand (are you listening, Behr?!!).
So, we layered 2 coats of Martha's pure white 
(no tint, straight out of the can - how's that for easy?!!) on top.
That's it, three coats, not too painful after all...


If you are looking for brilliant white walls, this is your paint -
the result was a very bright, slightly clinical space.
We color matched the box into a behr ultra base, as well.
(it's close to Brilliant Sea 520B-6)

This would do for the old cork board we planned to rescue from storage,
the existing mirror she used over her dresser, and a new long wall mirror.


We painted out a wire branch sculpture for an art/jewellry display....


Now, the palette was dynamic, 
but it needed warmth, and no ordinary canary or watermelon would do -
 so enter the fluorescents!

Yup, fluorescents.

Tash's idea :)

She's only this age once, why not let her have a little fun?

We upgraded a vintage dress form, and painted out some frames and canvasses
(I'll post more about the DIY art process tomorrow - SUPER easy)


Would you like to see how it all came together?


the view from the door...


Miss N headquarters - which is NEVER this tidy :)
We added a little zebra to the newly painted bulletin board -
looks like it's painted on, but it's actually a really heavy wrapping paper, shh, don't tell...


Ikea frames - 3 for $5.
With this price point and arrangement,
she can add to this wall whenever she likes.


Rocks and crystals.
It's a fascination, and she finds them EVERYWHERE :)
We corralled the largest and prettiest into lucite trays for display.


The bed.
Dressed with a new duvet and pillows (perfect for a constant "texter").
Framed out with our DIY art and a funny little printout that has sentimental value.


Are you wondering where all the teen "stuff" is?

Well, the dresser holds heaps of bits and bobs...
but what about the umpteen posters?

One is waiting to be hung behind the door...


and the rest live here....
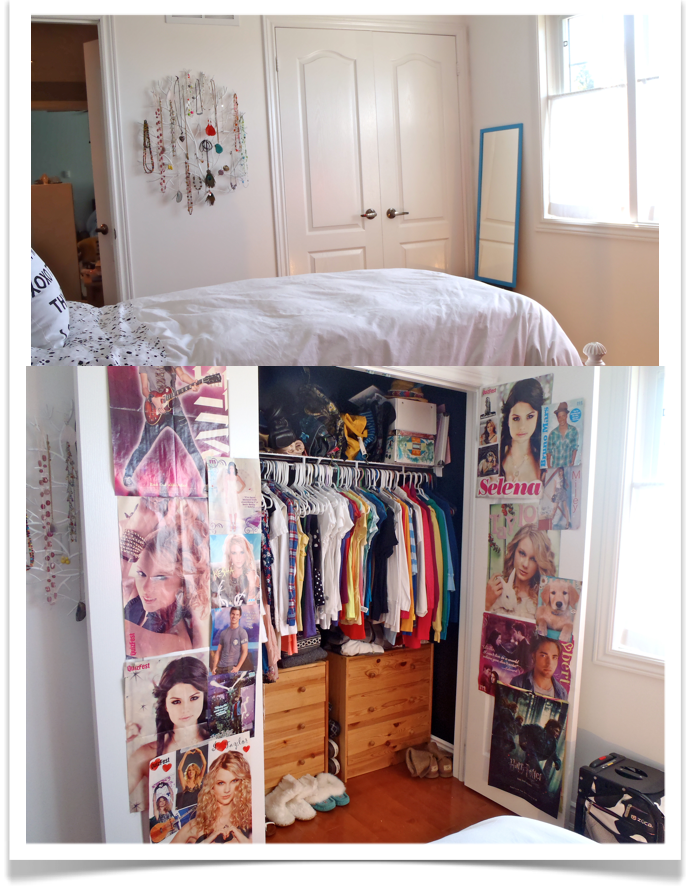


Let's just keep those closed, shall we?!

That's it, the big reveal...

hope you like it, 
Miss N is over the moon, and that will do for me - x


Miss N's room...a dummy project :)


Way back when I posted about Tasha's room...
it had black walls (previous owners) and she wanted to keep them,
so we found a way to make it work.

Well, it turns out the best way to get your child over wanting a black room is to just let them have it!
This spring, she asked me if we could paint her room,
because it was too dark :)

Of course, hon - what color would you like?

White.

umm.... white?!! Are you sure?

Yup.


To make a long story short,
we painted the walls, painted out a few accessories we already had,
and added a few new bits for a super fresh new look.

There's been a lot of little projects in the space,
like her jewelry display.


Today thought you may like to see another.

Tash chose a color scheme based on a box we found at homesense,
and I'll show you that later this week.


The palette we were working with was azure blue, black and white.
It felt a bit cold, though, and for a teen, needed an injection of fun.

That's where the fluorescent came in!

It's been sneaking into Miss N's wardrobe, so why not her room?


Last spring we went out "junktiquing" together, and lo and behold,
there it was - a dress dummy.


Tash negotiated a price of $5.00 (she's gooood!)
and into the truck she went,
in all her crumbling glory.
At this point, I'm thinking, "who need's a fancy restoration hardware version?"


When we got home, a closer look revealed she needed some work.


The fabric cover went out,
then we decided to give her a "neckotomy",
I sawed off the uneven bit with my favourite fancy tool,
an old steak knife :)
Then realized the top needed to be smoothed and hardened, 
because it was still crumbling.
Another very technical solution, hot glue!
I heaped on copious amounts, then spread it all over, like icing a cake...

Voila, finished neck.


A coat of BIN spray primer, and we thought we'd be good to paint.

The problem was that the entire form had texture, and not in a good way -
and it was still fairly fragile.

It needed a coat of something to harden it and create a better surface.
Since it had texture, why not go with more texture?

Out came the modge podge, and some tissue paper.
(I have to admit, at this point, the restoration hardware version was starting to look like more of a bargain!)
A coat modge podge, then tissue layered on top, working in the folds folds and creases.


Perfect. Sigh.

From there we needed a stand.... and this girl was surprisingly heavy.
I had planned to use a coat stand but could find one that had the right size pole and was sturdy enough.
So a wooden dowel, painted black, was placed into an old umbrella stand, also painted black.
I used pipe insulation to fill the gap between the dowel and stand.


Stand done.

Then the fun part,
Lily (as Tash has named her) got her color.

Fluorescent pink!


A pretty dramatic transformation....


Yesterday we finished another art project for the room, and today I'm hanging it all,
cross your fingers for some sun tomorrow so I can get you pics... 

happy monday!


Room Design Pictures Proudly Powered by Blogger